Riding a road bike should feel empowering and efficient, but if your correct seat position road bike setup is off, you might be dealing with nagging knee pain, lower back discomfort, or just plain inefficiency that turns every ride into a chore. Whether you’re a beginner cyclist or a seasoned rider tweaking your setup, getting the seat height, fore-aft position, and tilt right can make all the difference. The good news? A quick initial adjustment using a simple plumb line and your elbow can provide immediate relief, helping you pedal more comfortably right away.
In this comprehensive guide, we’ll go far beyond that basic fix to cover everything you need to know about achieving the correct seat position for your road bike. From essential tools and safety prep to a detailed step-by-step process, multiple adjustment methods, and post-setup testing, you’ll gain the confidence to optimize your fit like a pro. By the end, you’ll not only solve your current discomfort but also prevent future issues, ensuring longer, more enjoyable rides without the frustration.
Tools and Materials Needed for Road Bike Seat Adjustment

Before diving into adjustments, gather the right tools to make the process smooth and accurate. Most of these are basic bike shop staples or household items, and you can complete the setup in under an hour with them. This setup focuses on precision to achieve the correct seat position road bike experts recommend, based on guidelines from organizations like the International Bike Fitting Institute.
Here’s a breakdown of what you’ll need:
| Item | Quantity | Specifications |
|---|---|---|
| Allen wrenches | Set of 1 | Sizes 4mm, 5mm, and 6mm for seat post and saddle clamps |
| Plumb line or string with weight | 1 | For checking knee-over-pedal alignment (or use a laser level for precision) |
| Measuring tape or ruler | 1 | Flexible tape preferred, up to 1 meter for height measurements |
| Bike stand or repair stand | 1 (optional) | Wall-mounted or portable; elevates bike for easier access |
| Goniometer or angle finder app | 1 | Smartphone app like “Clinometer” for measuring seat tilt (0-5 degrees) |
| Bike computer or mirror | 1 | For real-time pedaling checks; a small mirror helps observe form |
| Saddle height calculator (online) | N/A | Free tools like those from BikeFit.com for initial estimates |
Important: If your road bike has a carbon fiber seat post, use torque wrenches to avoid over-tightening and damaging the material—aim for 5-6 Nm as per manufacturer specs.
Preparing Your Bike and Yourself for Seat Adjustment
Proper preparation ensures safety and accuracy when setting the correct seat position road bike style. Rushing this can lead to misalignment or even injury, so take your time. Start by choosing a well-lit, flat space like your garage or a bike shop workbench. Wear comfortable cycling shorts to mimic real riding conditions, and have a friend assist if possible for an objective eye.
Safety Considerations
- Warning: Always wear gloves to protect your hands from sharp edges on the bike frame. If you’re new to bike mechanics, consult your bike’s manual—some high-end road bikes like the Trek Madone or Specialized Tarmac have specific seat post tolerances.
- Secure your bike upside down on the stand or flip it over a soft surface to avoid scratching the frame. Ensure the wheels spin freely without wobbling.
- Warm up with a short 5-10 minute spin on a stationary trainer if available, as muscle fatigue can skew your perceived fit.
- Measure your inseam first: Stand barefoot against a wall, place a book between your legs, and measure from the floor to the book’s top edge. This is crucial for height calculations.
Initial Bike Check
Before adjustments, inspect for issues:
– Clean the seat post and rails to remove grime that could affect clamping.
– Check for wear: If the saddle is worn or the post is bent, replace them first to avoid inaccurate positioning.
– Note your current setup: Measure existing seat height from the center of the bottom bracket to the top of the saddle (pedal at 6 o’clock position).
This prep phase should take about 10-15 minutes and sets the foundation for a precise road bike seat position adjustment.
Step-by-Step Guide to Achieving Correct Road Bike Seat Position
Adjusting your seat involves three key elements: height, fore-aft (horizontal) position, and tilt. We’ll break it into phases, drawing from biomechanical standards like those from Lemond’s method or modern bike fit protocols. Aim for a setup where your hip angle at the bottom of the pedal stroke is around 30-35 degrees to maximize power without strain. The entire process takes 30-45 minutes.
Phase 1: Setting Saddle Height
Saddle height is the most critical for power transfer and injury prevention—too high causes rocking hips and lower back pain, too low strains knees. Use your inseam measurement for a starting point: Multiply inseam by 0.883 for road bikes (Holmes method, validated by cycling research).
- Loosen the seat post clamp with a 5mm or 6mm Allen wrench (turn counterclockwise).
- Raise or lower the post until the distance from the bottom bracket center to saddle top equals your calculated height.
- Sit on the bike in your normal riding position (hands on hoods), with pedals at 6 o’clock (heel on pedal).
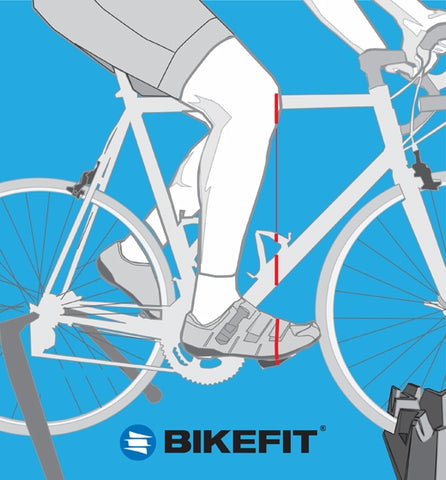
- Have a helper drop a plumb line from the bony prominence below your kneecap—it should align with the pedal axle for the correct seat position road bike.
- Tighten the clamp to 5-7 Nm. Test pedal a few strokes; adjust 2-3mm if needed.
If using an online calculator, input your inseam and shoe cleat position for a more personalized estimate. This phase alone can resolve 70% of common discomforts.
Phase 2: Adjusting Fore-Aft Position
This ensures your knee tracks properly over the pedal, optimizing quad engagement. Incorrect fore-aft can lead to IT band syndrome or hot feet.
- Place the bike on the stand and clip in (or simulate with straps if clipless).
- Position cranks at 3 o’clock (forward horizontal).
- Use the plumb line again: From the front of your kneecap, it should pass through the pedal spindle.
- Loosen the saddle rails clamp under the saddle (usually 4mm Allen keys).
- Slide the saddle forward or back: Most road bikes position the “KOPS” (Knee Over Pedal Spindle) at 5-10mm behind the spindle for aggressive riding.
- Retighten and recheck in the riding position. Fine-tune based on feel— if your hands go numb, move the saddle back slightly.
For riders with flexibility issues, aim for a more rearward position to reduce hamstring strain. This adjustment typically requires 1-2 iterations.
Phase 3: Fine-Tuning Saddle Tilt and Leveling
A level or slightly nose-down tilt (1-2 degrees) prevents pressure on soft tissues and improves comfort on long rides.
- Place the goniometer or app on the saddle’s centerline.
- Measure the angle: Ideal is 0 degrees level for most, or -1 to -3 degrees nose-down for forward-leaning road positions.
- Loosen the rails clamp again and adjust the tilt by tilting the saddle.
- Secure and sit-test: Rock side-to-side; no pressure on the nose means it’s correct.
- For women or those with perineal discomfort, consider a cutout saddle and slight tilt adjustment.
Pro Tip: After each phase, take a 5-minute test ride on flat terrain to assess. Variations like your bike model (e.g., endurance vs. racing geometry) may require tweaks—consult frame-specific guides.
Post-Adjustment Testing and Troubleshooting
Once set, test your correct seat position road bike setup to confirm it’s working. Ride 10-20 miles over varied terrain, noting any pain points. Use a bike computer to monitor cadence (aim for 80-100 RPM) and power output if you have a meter.
Basic Testing Steps
- Check for even pedaling: No knee wobble or hip rocking.
- Monitor comfort: No numbness after 30 minutes; adjust tilt if needed.
- Measure efficiency: If climbing feels harder, lower the seat 2mm.
Common Troubleshooting
- Knee pain persists? Raise seat 1-2mm or check cleat alignment—misaligned cleats can mimic height issues.
- Back discomfort? Move saddle forward and ensure core engagement during rides.
- If adjustments don’t stick: Inspect for loose clamps or worn parts; carbon posts may need grease.
- Advanced check: Visit a bike fitter for retulometry (hip angle measurement) if symptoms linger.
Regular re-testing every 500 miles accounts for fatigue or weight changes. Sources like Cycling Weekly recommend this for sustained performance.
Pro Tips for Optimal Road Bike Seat Position
![]()
To elevate your setup beyond basics, incorporate these expert insights from professional bike fitters:
– Personalize for riding style: Aggressive racers (e.g., on Cannondale SuperSix) prefer higher seats for aero positioning; commuters opt for lower for stability.
– Avoid common mistakes: Don’t adjust while standing—always in riding position. Overlooking shoe/pedal stack height can throw off measurements by 5mm.
– Optimize with accessories: Add a saddle bag with tools for on-the-road tweaks. Use chamois cream to test comfort without skin irritation.
– Maintenance routine: Clean and lube the seat post quarterly to prevent creaking; check torque after every 100 rides.
– Tech integration: Apps like TrainerRoad can analyze pedal stroke data post-adjustment for data-driven refinements.
– Body awareness: Track rides in a journal—note wattage drops or pain onset to iteratively improve.
– Seasonal adjustments: Slightly lower the seat in winter for stability on wet roads.
These tips can boost efficiency by 10-15%, per studies from the British Journal of Sports Medicine.
When to Seek Professional Help
While DIY adjustments work for most, some signs scream for a pro bike fitter:
– Persistent pain despite tweaks, especially in hips or IT bands.
– Custom builds or injuries (e.g., post-surgery) requiring specialized assessment.
– High-end bikes with integrated cockpits that limit adjustments.
Look for certified fitters via the BikeFit association—expect sessions from $150-300, including video analysis and adjustments. Check reviews on platforms like Yelp for expertise in road bike seat position. If under warranty, pro service preserves coverage; typical costs for saddle replacements run $50-200.
FAQ
Q: What’s the ideal saddle height for a 5’10” rider on a road bike?
A: For someone 5’10” with a 32-inch inseam, start at about 73-75cm from bottom bracket to saddle top using the 0.883 multiplier. Fine-tune with the heel method: Your heel should just touch the pedal at the bottom without rocking. Always test ride to confirm.
Q: How does seat position affect pedaling efficiency?
A: Proper correct seat position road bike aligns your hips and knees for optimal muscle recruitment, reducing energy waste by up to 20%. Too high wastes power on hip flexors; too low overloads quads. Biomechanics research shows KOPS alignment maximizes this.
Q: Can I adjust seat position without tools?
A: For quick fixes, yes—loosen by hand if clamps allow, but for precision, tools are essential to avoid stripping bolts. Use apps for estimates, but a plumb line substitute like string works in a pinch.
Q: Is there a difference in seat position for men vs. women?
A: Yes, women often benefit from wider saddles and slight nose-down tilts due to anatomy. General rules apply, but pros recommend gender-specific fits to avoid numbness—e.g., Specialized Mimic saddles for pressure relief.
Q: How often should I readjust my road bike seat position?
A: Every 3-6 months or after weight changes over 10lbs, new shoes, or 1,000 miles. Professional fits last longer but still need seasonal checks.
Q: What if my saddle slides during rides after adjustment?
A: Tighten clamps to spec (check your bike manual) and apply carbon assembly paste if applicable. If it persists, the rails may be worn—replace the saddle.
Q: Does correct seat position help with speed?
A: Absolutely—it improves power transfer and aerodynamics. Riders report 2-5% speed gains on flats after proper setup, per wind tunnel tests from brands like Cervélo.
Alternative Solutions for Road Bike Seat Adjustments
If DIY doesn’t suit you or your bike’s geometry is tricky, consider these options. For instance, if plumb line methods feel imprecise, switch to dynamic fitting systems.
| Solution | Pros | Cons | Best For |
|---|---|---|---|
| DIY Plumb Line Method | Free, quick (under 30 min), no special equipment | Less precise for complex fits; requires a helper | Beginners on standard road bikes like Giant Defy |
| Professional Bike Fit Session | Highly accurate with motion capture; includes full body assessment | Costs $200+; time-intensive (1-2 hours) | Competitive riders or those with injuries |
| Self-Fitting Apps (e.g., Gebiomized) | Affordable ($50-100 kit), uses lasers for home use | Learning curve; not as holistic as pro service | Tech-savvy users wanting intermediate precision |
| Adjustable Seat Posts (e.g., Bontrager Dropout) | On-the-fly height changes during rides | Expensive ($300+); adds weight | Variable terrain riders needing quick tweaks |
Choose based on your budget and needs—apps bridge the gap for many.
Enjoy Your Optimized Road Bike Rides
With this guide, you’ve got the tools to nail the correct seat position road bike setup and transform your cycling experience:
- Essential tools and prep for safe adjustments
- Detailed phases for height, fore-aft, and tilt
- Testing methods and pro tips for long-term success
Following these steps ensures comfort, efficiency, and injury prevention, so you can focus on the joy of the ride. Don’t wait—grab your Allen keys and make those tweaks today; you’ll feel the difference on your next spin.
Have you adjusted your road bike seat position using this guide? Share your before-and-after experience in the comments below to inspire other cyclists! If discomfort lingers, a quick pro consult could be your best investment for peak performance.

