Dealing with a wobbly or broken bike seat can be incredibly frustrating, especially when you’re in the middle of a ride and suddenly feel like your saddle is about to slide off. If you’re searching for how to fix bike seat rails, you’re not alone—bike seat rails are prone to issues from everyday wear, accidents, or improper installation, leading to discomfort, instability, or even safety risks. The good news is that many problems can be resolved with a quick fix using basic tools, often in under 30 minutes, restoring your bike’s comfort and performance without a trip to the shop.
In this comprehensive guide, we’ll go beyond the basics to cover everything from identifying the root causes of bike seat rail problems to step-by-step repair methods, ranging from simple adjustments to full replacements. By the end, you’ll have the confidence and knowledge to tackle any bike seat rails issue, save money on professional repairs, and keep your bike riding smoothly for years to come. Whether you’re a casual commuter or an avid cyclist, these actionable solutions will get you back on the road fast.
Common Causes of Bike Seat Rail Issues
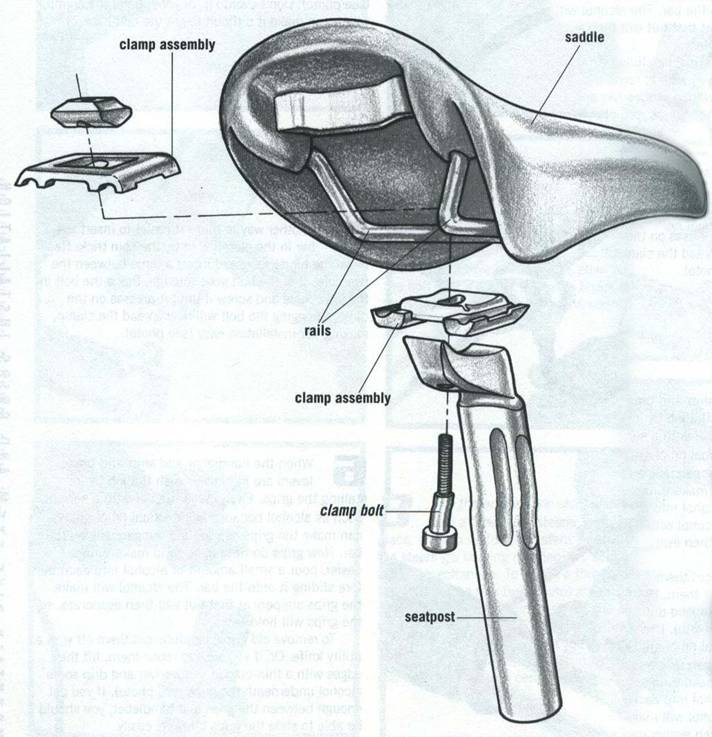
Bike seat rails are the metal rods that connect your saddle to the seat post, and they’re designed to withstand a lot of stress. However, they can fail over time due to various factors. Understanding these causes is the first step in effectively fixing bike seat rails and preventing future problems. Below, we’ll break down the most frequent culprits with detailed explanations to help you diagnose your issue quickly.
Wear and Tear from Regular Use
Over time, constant pedaling and weight pressure can cause micro-fractures or bending in the seat rails, especially on older or cheaper bikes. This is common in mountain bikes or those used for rough terrain, where vibrations accelerate the degradation. If your rails feel loose or creak during rides, this might be the issue—inspect for visible thinning or discoloration, which indicates metal fatigue.
Over-Tightening or Improper Installation
One of the top reasons for damaged bike seat rails is clamping the seat post collar too tightly during setup. This can crush or deform the rails, leading to slippage or breakage. Riders often make this mistake when trying to secure a wobbly saddle, but it creates uneven pressure points. Check your rails for indentations or flattened sections near the clamp area; this is a classic sign of over-tightening.
Impact from Crashes or Drops
Accidents happen, and a fall or even dropping your bike can bend or snap the seat rails. Carbon fiber rails are particularly vulnerable to impacts, cracking invisibly under stress. If you’ve recently had a spill and now notice the saddle tilting or shifting, inspect for bends or cracks—use a flashlight to spot hairline fractures that might not be obvious at first glance.
Corrosion and Environmental Exposure
Exposure to rain, sweat, or road salt can lead to rust on steel rails, weakening them and causing them to snap under load. This is more prevalent in urban or wet climates. Look for reddish-brown spots or pitting on the rails; if ignored, corrosion spreads and makes repairs harder.
How to Fix Bike Seat Rails: Step-by-Step Solutions
Fixing bike seat rails doesn’t have to be complicated, but the approach depends on the severity of the damage. We’ll outline three progressive methods, from quick fixes for minor issues to advanced repairs for broken rails. Start with the simplest and escalate if needed. Always work in a well-lit area and wear safety gloves to avoid cuts from sharp edges. These methods apply to most standard bike saddles with 7mm round rails, but check your model’s specs for variations.
Method 1: Tightening and Adjusting Loose Rails (Quick Fix for Minor Slippage)
If your bike seat rails are slipping but not damaged, this 10-15 minute fix can resolve it without tools beyond basics. It’s ideal for first-time issues caused by loose clamps.
Diagnosing the Issue
Park your bike on a stable stand or flip it upside down. Sit on the saddle and rock it side to side—if it moves more than 1-2mm, the rails are loose. Inspect the seat post clamp for proper alignment; misalignment often causes uneven grip.
Fix Steps
- Loosen the seat post clamp bolt using an Allen wrench (typically 5mm for most bikes). Turn counterclockwise until the saddle lifts easily.
- Reposition the saddle to your preferred height and fore-aft position—use a level tool for even alignment.
- Tighten the clamp gradually to 5-6 Nm torque (use a torque wrench if available to avoid over-tightening). For carbon rails, never exceed 4-5 Nm to prevent crushing.
- Test by mounting the bike and bouncing gently; if it holds, you’re done.
Testing the Repair
Ride for 5-10 minutes on a flat surface. If slippage persists, the clamp might be worn—proceed to Method 2.
Warning: Over-tightening can permanently deform rails. If you’re unsure about torque, consult your bike’s manual or a local shop.
Method 2: Straightening Bent Rails (For Moderate Deformation)
Bent rails from impacts can often be straightened at home with careful tools, taking about 20-30 minutes. This method works best for steel or aluminum rails; skip it for carbon, as they require replacement.
Diagnosing the Issue
Remove the saddle by loosening the clamp and sliding it off the post. Lay the saddle upside down on a flat surface and check for bends by sighting along the rails—they should form a straight line. Measure any deviation with a ruler; bends over 5mm need professional attention.
Fix Steps
You’ll need: Vise grips, rubber mallet, and wooden blocks for padding.
- Secure the saddle in a soft-jaw vise or between padded wooden blocks to protect the padding.
- Gently tap the bent section with the rubber mallet while holding the rail steady with vise grips. Work in small increments, checking straightness after each tap.
- For stubborn bends, heat the rail slightly with a hairdryer (avoid torches to prevent weakening metal), then reshape.
- Reinstall on the seat post and torque to spec (as in Method 1).
Testing the Repair
Compress the saddle repeatedly with your hands, then test ride. If it wobbles or creaks, the bend might be too severe—move to replacement.
Important: Never force bent carbon rails, as they can shatter. Always wear eye protection during hammering.
Method 3: Replacing Damaged Rails (Advanced Fix for Breaks or Severe Wear)
For snapped, corroded, or irreparably bent rails, replacement is the most reliable solution, costing $20-50 for new rails and taking 45-60 minutes. This involves removing the old rails and installing compatible ones.
Diagnosing the Issue
If the rails are cracked or broken, they won’t support weight—listen for snapping sounds when pressing down. Confirm by fully removing the saddle and examining under good light.
Fix Steps
Materials and Tools Needed:
| Item | Quantity | Specifications |
|---|---|---|
| Replacement seat rails | 1 set | Match your saddle type (e.g., 7mm steel or carbon; check saddle underside for compatibility) |
| Rail cutter or hacksaw | 1 | Fine-tooth blade for clean cuts |
| Epoxy or rail glue | 1 tube | Bike-specific, two-part adhesive |
| Clamps or binding wire | 2-3 | For securing during curing |
| Allen wrenches | Set | 4-6mm for disassembly |
| File or sandpaper | 1 | For smoothing ends |
- Disassemble the saddle: Unscrew the frame clamps or nuts holding the old rails (use penetrating oil for rusted ones). Remove the rails carefully to avoid damaging the saddle shell.
- Cut new rails to length: Measure the old ones and cut 1-2mm shorter to fit. File ends smooth for a clean insert.
- Insert and secure: Apply epoxy to the rail ends and slide into the saddle frame slots. Clamp in place and let cure for 24 hours (follow epoxy instructions).
- Reinstall on bike: Slide onto seat post, align, and torque clamp as before.
Testing the Repair
After curing, perform a static load test by sitting on the bike (unsupported). Then, take a short test ride. Monitor for any new noises or shifts.
Warning: Mismatched rails can cause instability—always verify compatibility with your saddle manufacturer, like Brooks or Selle Italia models.
Prevention Tips and Maintenance Advice
To avoid future bike seat rail problems, incorporate these habits into your routine. Regular checks can extend rail life by years and save you repair time.
- Inspect Monthly: During tire checks, examine rails for bends, rust, or looseness. Clean with a degreaser and apply anti-seize lubricant to the clamp area.
- Use Proper Torque: Always use a torque wrench for installations—over 7 Nm on steel rails risks damage.
- Protect from Elements: Store your bike indoors or use a cover. For wet rides, rinse and dry rails immediately to prevent corrosion.
- Upgrade Wisely: If replacing, opt for titanium rails for durability (though pricier at $50+), especially for heavy riders or rough use.
- Avoid DIY Hacks: Don’t use zip ties or tape as temporary fixes—they compromise safety.
Pro Tips for Bike Seat Rail Repairs

Go beyond the basics with these expert insights to ensure long-lasting results and optimal comfort:
- Match Rail Diameter: Most are 7mm, but some vintage or specialized saddles use 7.94mm—measure with calipers to avoid fit issues.
- Common Mistake to Avoid: Ignoring saddle tilt after repair; use a spirit level app on your phone for perfect fore-aft balance, reducing back strain.
- Optimize Performance: After fixing, adjust saddle height using the knee-over-pedal method (leg straight at bottom of stroke) for efficient pedaling.
- Maintenance Hack: Apply frame protector tape under the clamp to prevent paint scratches and rail marring.
- For Carbon Bikes: Use carbon-specific grips and never grease clamps—opt for dry lube to avoid slippage.
- Eco-Friendly Tip: Reuse old rails if undamaged by donating to bike co-ops; reduces waste and supports community cycling.
- Upgrade Opportunity: While fixing, consider a seat post with micro-adjust for easier future tweaks.
When to Seek Professional Help
While DIY fixes for bike seat rails are empowering, some situations warrant a pro. Signs include: invisible carbon cracks (detectable only with ultrasound), complex saddle designs (e.g., integrated carbon shells), or if repairs fail after attempting Methods 1-2. Persistent issues might indicate frame alignment problems.
Look for a reputable bike shop certified by organizations like the United Bicycle Institute, with good reviews on Google or Yelp. Expect costs of $20-50 for simple straightening or $50-100 for full replacement, plus parts. Check your bike’s warranty—many cover rail defects for 1-2 years; contact the manufacturer like Trek or Specialized before DIY to avoid voiding it.
FAQ
Q: Can I fix bike seat rails with household tools?
A: Yes, for minor issues like loosening, basic tools like Allen wrenches and pliers suffice. For bends or replacements, invest in a torque wrench and rail cutter for safety and precision—household hammers can cause more damage if not padded properly.
Q: How do I know if my bike seat rails are carbon or metal?
A: Carbon rails are lightweight, smooth, and often black; metal (steel/aluminum) are heavier with a metallic sheen. Check your saddle specs online or tap them—carbon sounds dull, metal rings. Mislabeled repairs can lead to breakage.
Q: Why do my bike seat rails keep slipping even after tightening?
A: This could be due to a worn clamp, grease buildup, or undersized rails. Clean thoroughly, apply friction paste (like Park Tool SAC-2), and retorque. If it persists, replace the seat post collar for $10-20.
Q: Is it safe to ride with slightly bent bike seat rails?
A: No—bends create stress points that can snap mid-ride, leading to falls. Even minor ones cause uneven weight distribution, risking injury. Fix immediately using Method 2 or replace to ensure stability.
Q: How much do replacement bike seat rails cost?
A: Basic steel sets start at $10-15, aluminum at $20-30, and premium titanium/carbon at $40-80. Factor in $5-10 for epoxy. Shop at REI or Amazon for deals, but verify compatibility with your saddle model.
Q: Can I prevent corrosion on bike seat rails?
A: Absolutely—wipe rails dry after wet rides and apply a corrosion inhibitor like Boeshield T-9. For salty roads, rinse weekly. Stainless steel rails resist rust better but cost more upfront.
Q: What if my saddle has cutouts or unique rail shapes?
A: Standard methods apply, but consult the manual for proprietary clamps (e.g., on Fizik saddles). If unsure, take photos and visit a shop—mismatched fixes can void warranties or cause poor fit.
Alternative Solutions for Bike Seat Rail Problems
If repairing the existing rails isn’t feasible (e.g., due to saddle age or material), consider these alternatives. They’re great when DIY feels overwhelming or for upgrading.
| Solution | Pros | Cons | Best For |
|---|---|---|---|
| Full Saddle Replacement | Quick install, often includes better padding/ergonomics; $50-150 range | Higher cost; requires re-setup | Riders wanting a comfort upgrade or with integrated designs |
| Rail Adapters/Clamps | Affordable ($10-20); fixes mismatched sizes without full replacement | May add weight; not for severe damage | Budget fixes on vintage bikes |
| Seat Post Upgrade (e.g., with built-in clamp) | Improves overall stability; micro-adjust features | $30-100; involves more disassembly | Commuters with frequent adjustments |
| Professional Re-Railing Service | Expert precision; preserves favorite saddle | $40-80 labor; shop wait times | High-end saddles like leather Brooks models |
Compare based on your budget and ride style— for example, adapters work well for casual use but not racing.
Get Your Bike Seat Rails Fixed and Ride Confidently
With this guide, you’ve got everything to tackle bike seat rail issues head-on and restore your bike’s reliability:
- Diagnose common causes like wear, over-tightening, or corrosion
- Apply quick fixes, straightening, or full replacements with detailed steps
- Follow prevention tips and pro advice to avoid repeats
Don’t let faulty rails derail your cycling adventures—start with the simplest method today, and you’ll be pedaling smoothly in no time. Following these steps not only saves money but ensures safer, more comfortable rides.
Have you successfully fixed your bike seat rails using these methods? Share your experience in the comments below to help fellow cyclists! If issues persist, describe your setup for tailored advice.