Riding your bike should feel liberating and invigorating, but if your bike seat is too high, it can turn every pedal stroke into a source of frustration, pain, or even injury. Whether you’re a casual commuter or an avid cyclist, dealing with discomfort like knee strain, hip rocking, or numbness in your feet is a common red flag that your saddle height isn’t right. The good news? You can quickly identify if your bike seat is too high with a few simple self-checks, and adjusting it down just a notch can provide immediate relief without needing fancy tools.
In this comprehensive guide, we’ll go beyond the basics to help you diagnose the issue thoroughly. You’ll learn the telltale signs of a bike seat that’s too high, step-by-step methods to measure and adjust it yourself, and tips to prevent future fitting problems. By the end, you’ll have the confidence to tweak your setup for optimal comfort and performance, ensuring every ride is smooth and enjoyable—no more guessing games with your bike’s ergonomics.
Signs Your Bike Seat is Too High
Spotting if your bike seat is too high early can save you from chronic issues like lower back pain or reduced pedaling efficiency. A saddle that’s set too high forces your body into unnatural positions, leading to overextension and strain. Below, we’ll break down the most common symptoms using H3 headings for easy scanning. If you’re experiencing two or more of these, it’s time to act.
Knee Pain or Hyperextension
One of the clearest indicators of a bike seat too high is pain around your knees, especially during the downstroke of your pedal cycle. When the saddle is elevated excessively, your legs straighten too much at the bottom of the pedal stroke, causing your knees to hyperextend (lock out completely). This puts undue stress on the knee joint and surrounding ligaments.
How to check: While pedaling at a moderate cadence (around 80-90 RPM), look down or feel if your knees are fully extending or “snapping” straight. Riders often report a sharp ache on the front or back of the knee after longer rides. According to cycling experts from the Bike Fitting Institute, this hyperextension can lead to patellar tendonitis if ignored. If this sounds familiar, lower your seat by 1-2 cm and test ride to see if the pain eases.
Hip Rocking or Swaying
If your hips are rocking side to side as you pedal, it’s a classic sign your bike seat is too high. This compensatory movement happens because your legs can’t reach the pedals comfortably, forcing your pelvis to shift to generate power. Over time, this can cause lower back pain, sciatica-like discomfort, or even saddle sores from uneven pressure.
Quick self-test: Clip in (or place feet on pedals if using flats) and pedal slowly in a stationary position, like against a wall. Have a friend observe from behind—if your hips wobble more than a slight natural roll, the seat height is likely the culprit. Studies from the Journal of Sports Sciences show that excessive hip movement reduces power output by up to 10%, making your rides less efficient. Adjusting downward often stabilizes your core instantly.
Numbness or Tingling in Feet or Hands
A bike seat that’s too high can disrupt your body’s alignment, leading to numbness or tingling in your feet, toes, or even hands. This occurs because overextended legs compress nerves in the lower body, and your upper body might hunch forward to compensate, pinching nerves in your neck or shoulders.
Why it happens: With the saddle too elevated, your feet may not plant squarely on the pedals, causing slippage or awkward ankle angles that restrict blood flow. Cyclists frequently describe a “pins and needles” sensation after 20-30 minutes of riding. If you’re feeling this, especially on longer routes, it’s not just fatigue—it’s a fitting issue. Important: Persistent numbness could signal more serious nerve compression, so consult a doctor if it doesn’t resolve with adjustments.
Reduced Power and Fatigue
Feeling like you’re working harder than usual for less speed? A too-high bike seat forces inefficient leg extension, where you “reach” for the pedals instead of pushing smoothly. This leads to quicker muscle fatigue in your quads and hamstrings, and you might notice your cadence dropping below 70 RPM without effort.
Diagnostic tip: Compare your average speed or heart rate on a familiar route before and after suspected adjustments. If power feels sapped, measure your leg extension (more on this below). Research from cycling performance labs indicates that optimal saddle height can boost efficiency by 5-15%, so getting this right is key for both casual and competitive riders.
Back or Neck Strain
Finally, if you’re battling lower back aches or a stiff neck post-ride, your bike seat might be too high, arching your spine unnaturally. This overextension tilts your pelvis backward, straining the lumbar region, while your head might jut forward to maintain balance.
Warning: Chronic back pain from poor bike fit can exacerbate existing conditions like herniated discs. If you notice forward hunching or arching, it’s time for a check—don’t push through it, as it could lead to long-term injury.
How to Measure and Check Your Bike Seat Height
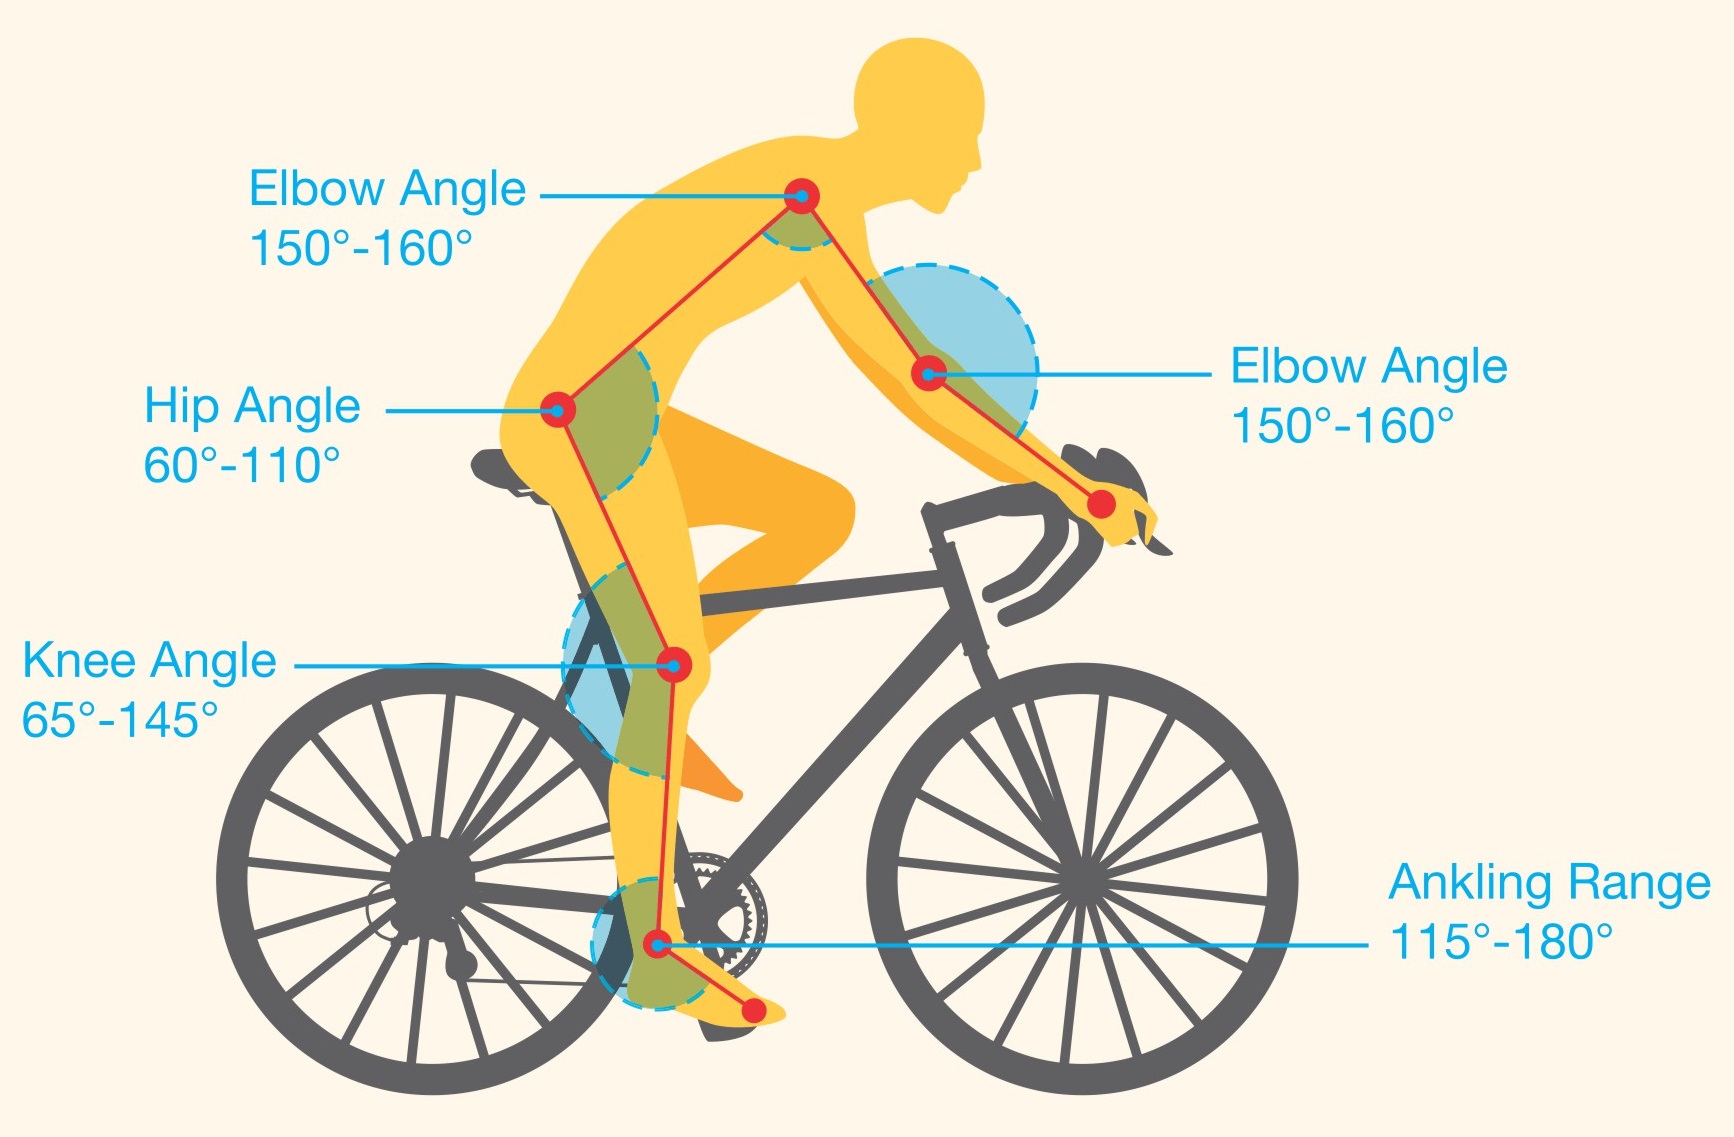
Now that you’ve identified potential signs, it’s time to confirm if your bike seat is too high with precise measurements. This section provides actionable steps to assess your current setup. Proper saddle height is typically where your leg is almost fully extended at the bottom of the pedal stroke, with a slight bend in the knee (about 25-35 degrees).
Tools and Materials Needed
Before diving in, gather these basics—no need for expensive gear:
| Item | Quantity | Specifications |
|---|---|---|
| Plumb line or string | 1 | Straight, non-elastic for accurate alignment |
| Measuring tape or ruler | 1 | At least 1 meter long, in cm for precision |
| Bike stand or wall | 1 | To stabilize the bike; optional but helpful |
| Mirror or helper | 1 | For observing pedal stroke without straining |
| Allen wrench set | 1 | 5mm or 6mm for seat post adjustments |
These items should cost under $20 if you don’t have them already.
Step-by-Step Measurement Process
Follow these phases to diagnose accurately. The whole process takes about 15-20 minutes.
Phase 1: Basic Leg Extension Check
- Position your bike on a flat surface or stand. Sit on the saddle as you would while riding, with shoes clipped in or feet on pedals.
- Bring one pedal to the 6 o’clock position (bottom dead center). Your heel should just touch the pedal axle without rocking your hips.
- Measure the angle: Your knee should have a 30-35 degree bend. Use a goniometer app on your phone if available, or estimate by sighting along your leg— it shouldn’t lock straight.
- Repeat for the other leg. If either knee hyperextends (0-10 degrees bend), your seat is too high. Safety note: Wear cycling shoes for accuracy; street shoes can skew results by 1-2 cm.
Phase 2: Lemond Method for Precise Calculation
Named after cycling legend Greg LeMond, this is a reliable DIY formula:
1. Stand barefoot against a wall and measure from the floor to the top of your pubic bone (ischial tuberosity height approximation).
2. Multiply this inseam length by 0.883 to get your ideal saddle height from the center of the bottom bracket to the top of the saddle.
3. Example: If your inseam is 80 cm, ideal height = 70.64 cm. Compare to your current setup by loosening the seat post clamp and measuring.
4. Adjust if off by more than 1 cm. This method accounts for crank length (standard 170mm) and is backed by biomechanical studies for road bikes.
Phase 3: On-Bike Test Ride
- After measuring, take a 5-10 minute test ride on flat terrain at your usual cadence.
- Note any of the signs from earlier—if discomfort persists, lower by 0.5 cm increments and retest.
- Troubleshooting if it doesn’t improve: Check for other issues like cleat position or frame size mismatch, which can mimic high saddle symptoms.
How to Adjust Your Bike Seat Height

Once confirmed, lowering your bike seat is straightforward and reversible. We’ll cover three methods, from quick tweaks to advanced fitting.
Method 1: Quick DIY Adjustment (5-10 Minutes)
- Loosen the seat post clamp bolt with an Allen wrench (usually under the saddle).
- Slide the post down incrementally—start with 1 cm.
- Tighten securely (torque to 5-6 Nm to avoid slippage).
- Test ride and repeat if needed. This is ideal for immediate relief on mountain or hybrid bikes.
Method 2: Using a Bike Fit App or Laser Level (15 Minutes)
For precision:
1. Download a free app like Bike Fast Fit.
2. Align a laser level along your leg during the pedal stroke to ensure even extension.
3. Adjust based on app feedback, which often includes videos for visual guidance.
4. Best for road bikes where aerodynamics matter.
Method 3: Professional-Style Static Fit (20-30 Minutes)
- Remove pedals and set cranks horizontal.
- Use a plumb line from your kneecap to the pedal axle—it should align with the ball of your foot.
- Fine-tune height for a 30-degree knee angle using a protractor.
- Reinstall and test. This method, recommended by USA Cycling, minimizes error.
Warning: Always clean the seat post before readjusting to prevent corrosion, and mark your original height with tape for easy reversal.
Prevention Tips and Proper Bike Fitting
To avoid a bike seat too high in the future, incorporate regular checks into your routine. Aim to reassess height every 3-6 months or after bike upgrades like new pedals.
- Maintenance Schedule:
| Frequency | Task | Duration |
|---|---|---|
| Weekly | Quick heel-pedal touch check during rides | 2 minutes |
| Monthly | Full LeMond measurement and test ride | 10 minutes |
| Annually | Professional bike fit, especially if you’ve gained/lost weight or changed bikes | 1 hour |
Follow these to maintain peak comfort. Also, consider your riding style: Road cyclists may prefer slightly higher seats for efficiency, while MTB riders opt lower for control.
Pro Tips for Optimal Bike Seat Adjustment
Here are 5-7 expert insights to elevate your setup beyond basics:
- Avoid common mistakes: Don’t adjust while wearing thick socks—they add false height. Also, never raise the saddle above the manufacturer’s max line to prevent frame damage.
- Optimize for your body type: Taller riders (over 6ft) may need extended seat posts; shorter ones benefit from shorter cranks to avoid overextension.
- Incorporate core strength: Weak abs can amplify high saddle issues—add planks to your routine for better stability.
- Test in varied conditions: What feels good on flats might strain on hills; adjust for multi-terrain use.
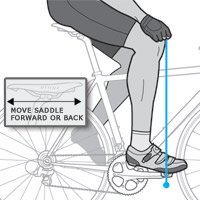
- Pair with fore-aft positioning: After height, slide the saddle forward/back so your knee tracks over the pedal spindle.
- Upgrade smartly: Consider adjustable posts for quick changes on different bikes.
- Monitor wear: Replace worn saddles every 2-3 years, as they compress and alter effective height.
These tweaks can improve your ride by 20% in comfort, per cycling biomechanics research.
When to Seek Professional Help
While DIY works for most, call in a pro if:
– You’ve tried adjustments but pain persists (could indicate leg length discrepancy).
– You’re experiencing severe numbness or injury history.
– Your bike is custom or high-end (e.g., carbon frame risks).
Look for certified fitters from organizations like the International Bike Fitting Institute—expect $100-250 for a session. Costs vary by location; in urban areas, it’s often $150 average. Check warranty terms, as improper fits might void them. A good fitter uses motion capture for personalized results.
FAQ
Q: How much should I lower my bike seat if it’s too high?
A: Start with 1 cm reductions, testing after each. Most riders find relief within 2-3 cm, but never drop more than 5 cm at once to avoid overcompensation, which could cause knee compression.
Q: Can a bike seat too high cause long-term injury?
A: Yes, prolonged hyperextension risks tendonitis, IT band syndrome, or back issues. Address it promptly; if symptoms last weeks, see a sports medicine specialist.
Q: What’s the difference between seat height and saddle tilt?
A: Height affects leg extension, while tilt (nose angle) impacts pressure on soft tissues. A too-high seat often pairs with forward tilt—aim for level or 2-5 degrees downward for comfort.
Q: Is there an ideal saddle height for beginners?
A: Yes, err on the conservative side: Use the heel method for new riders to build confidence without strain. As you progress, graduate to the LeMond formula.
Q: Does bike type matter for seat height?
A: Absolutely—road bikes allow higher for aero efficiency, while hybrids or commuters need lower for stability. Always tailor to your primary use.
Q: What if my seat post won’t budge?
A: Apply penetrating oil like WD-40, let it sit 10 minutes, then tap gently with a mallet. If stuck, a bike shop can remove it safely to avoid damage.
Q: How do I know if my saddle is too low instead?
A: Signs include knee pain on the upstroke, hip bunching, or feeling “crunched.” Measure for excessive knee bend (over 45 degrees) at bottom dead center.
Ride Comfortably with the Right Seat Height
Armed with this guide, you’re equipped to spot and fix a bike seat too high for good:
– Key signs like knee hyperextension and hip rocking
– Precise measurement and adjustment methods
– Prevention strategies and pro tips for long-term success
Following these steps ensures pain-free, efficient rides that let you focus on the joy of cycling. Take action today—measure your setup and hit the road with renewed confidence. Your body will thank you!
Have you adjusted your bike seat height recently? Share your before-and-after experience in the comments below to help fellow cyclists!