
If you’ve been ripping through trails on your dirt bike and noticed the seat foam crumbling or the cover tearing, you’re not alone—many riders face this frustrating wear and tear after just a few seasons of hard riding. Recovering a dirt bike seat might sound intimidating, but it’s a rewarding DIY project that can save you hundreds compared to professional reupholstering. In this guide, we’ll walk you through a quick fix for minor damage using basic adhesives and patches, giving you immediate relief to get back on the track without delay.
Beyond that initial patch job, this comprehensive how-to will dive deep into a full seat recovery process, covering everything from tools and materials to step-by-step instructions. Whether you’re dealing with a ripped cover on a Yamaha YZ or a sagging seat on a Honda CRF, we’ll provide multiple approaches—from simple repairs to advanced reupholstering—so you can choose what fits your skill level and budget. By the end, you’ll have the confidence to restore your seat like a pro, extending its life and improving your riding comfort for years to come.
What You’ll Need for Dirt Bike Seat Recovery
Before diving into the recovery process, gathering the right materials and tools is crucial to ensure a smooth, professional-looking result. This project typically takes 4-6 hours for beginners, but having everything prepped will save you time and frustration. Focus on high-quality, weather-resistant materials since dirt bike seats endure mud, water, and constant abrasion.
Here’s a breakdown of essentials in table format for easy reference:
| Item | Quantity | Specifications |
|---|---|---|
| Seat Cover (Grippy Vinyl or Leatherette) | 1 | Custom-fit for your model (e.g., 14-16 inches wide for most 250cc bikes); UV-resistant and waterproof; available from brands like Seat Concepts or online suppliers like Rocky Mountain ATV/MC |
| Seat Foam (High-Density Polyurethane) | 1 block | 1-2 inches thick, density of 2.2-2.5 lbs/ft³ for durability; match your bike’s original dimensions (measure yours first) |
| Seat Pan/Base | 1 | Original from your bike; plastic or fiberglass, cleaned and inspected for cracks |
| Adhesive Spray (3M Super 77 or Contact Cement) | 1 can | High-tack, flexible formula safe for foam; avoid oil-based glues that degrade materials |
| Staples and Staple Gun | 200-300 staples | 3/8-inch galvanized staples for heavy-duty use; pneumatic or electric gun for precision |
| Utility Knife or Seat Cover Cutter | 1 | Sharp, retractable blade for clean cuts |
| Pliers and Screwdriver Set | 1 set | Needle-nose pliers for staple removal; Phillips/flathead for seat disassembly |
| Sandpaper (80-220 Grit) | 1 pack | For smoothing foam and prepping the pan |
| Gloves and Safety Mask | 1 pair each | Nitrile gloves to protect hands; mask for adhesive fumes |
| Optional: Heat Gun | 1 | For stretching vinyl covers without wrinkles |
Budget-wise, expect to spend $50-150 on materials, depending on whether you reuse your existing foam or buy new. Source parts from reputable sites like RevZilla or your local powersports dealer to ensure compatibility with models like KTM 450 or Kawasaki KX.
Preparing Your Workspace and Safety Considerations
A successful dirt bike seat recovery starts with proper preparation—rushing this can lead to uneven results or safety hazards. Set aside a well-ventilated garage or outdoor area with good lighting, as adhesives release fumes that aren’t ideal for enclosed spaces. Lay down drop cloths or newspapers to protect surfaces from glue overspray, and work on a stable workbench at waist height for comfort.
Safety first: Always wear gloves and a mask when handling adhesives or cutting materials, as they can irritate skin and lungs. If your seat pan has sharp edges from wear, file them down to avoid cuts. Disconnect your bike’s battery if you’re working near electrical components, though this project is mostly off-bike. For riders under 18, have adult supervision, especially with tools like staple guns. Test adhesives on scrap material first to ensure compatibility, and keep a fire extinguisher nearby since some glues are flammable. If you’re recovering a seat for a high-performance bike like a motocross racer, double-check that the new cover meets grip standards to avoid slippage during jumps.
Preparation steps include:
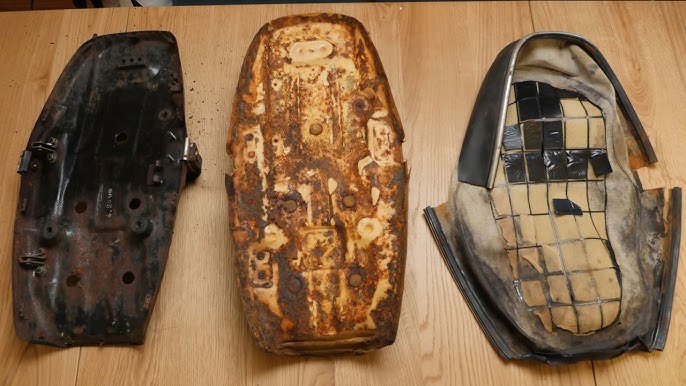
– Removing the seat from your dirt bike: Unscrew the mounting bolts (usually 2-4 per side) and lift it off—takes about 5 minutes.
– Inspecting for damage: Check the pan for cracks (repair with fiberglass resin if needed) and note foam compression.
– Cleaning thoroughly: Wipe down the pan with isopropyl alcohol to remove dirt, oils, or old adhesive residue. Let it dry completely (15-20 minutes).
Addressing these upfront prevents complications like poor adhesion or uneven seating that could affect your ride stability.
Step-by-Step Dirt Bike Seat Recovery Process
Now for the heart of the project: the full recovery. We’ll break it into logical phases, from disassembly to final assembly. This method assumes a complete reupholster but includes tips for partial recoveries if your damage is minor. Use numbered lists for precise sequencing, and take your time—rushing leads to wrinkles or loose fits.
Phase 1: Disassembly and Foam Preparation
Start by stripping down the old seat to assess what’s salvageable. This phase takes 30-45 minutes and helps you avoid wasting new materials.
-
Remove the old cover: Use pliers to pull out all staples from the underside of the seat pan. Work methodically around the edges, pulling the vinyl away gently to avoid tearing the foam. Dispose of the old cover responsibly—recycle if possible.
-
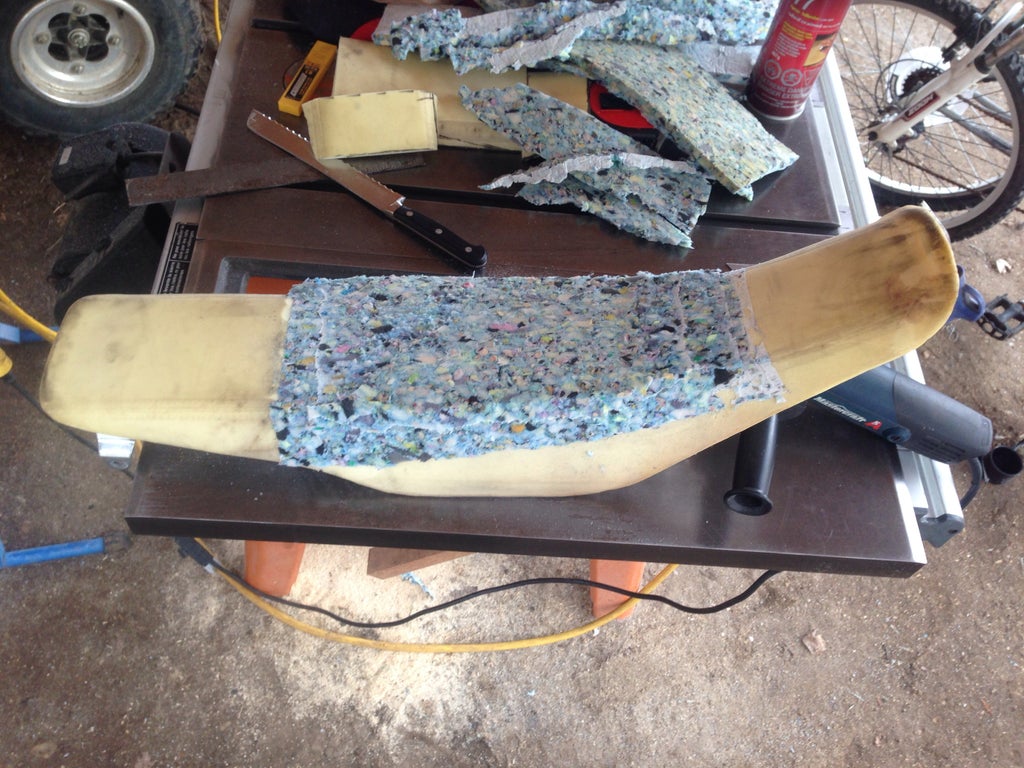
Extract the foam: Peel the foam off the pan. If it’s glued down, apply a bit of heat from a hairdryer (not a heat gun yet) to loosen adhesive. Inspect the foam: If it’s only slightly compressed, you can reuse it after reshaping; otherwise, replace with new high-density foam for better support.
-
Shape and sand the foam: If using new foam, trace the pan’s outline onto it and cut with a utility knife, leaving 1/2-inch overhang for stapling. Sand the base flat with 80-grit paper, then smooth edges with 220-grit. For worn foam, compress and release it multiple times to restore bounce, or carve out soft spots and fill with foam scraps glued in place.
Tip: Measure your original foam’s height at key points (e.g., nose and sides) to maintain ergonomics—too thick, and you’ll slide forward; too thin, and you’ll feel the pan.
Phase 2: Applying the New Cover and Securing It
With the base prepped, it’s time to fit the new cover. This is where precision matters for a taut, professional finish. Allocate 1-2 hours here.
-
Prep the pan: Spray the pan’s foam-contact area lightly with adhesive and let it tack up for 1 minute. Press the foam firmly into place, ensuring no air bubbles. Use weights (like books) to hold it for 10-15 minutes while it bonds.
-
Test-fit the cover: Drape the new seat cover over the foam, aligning seams with the pan’s contours. Tug gently to check for excess material—trim if needed, but leave extra for stretching.
-
Stretch and staple: Start at the front center of the pan. Pull the cover taut and staple every 1/2 inch along the front edge, using the staple gun at a 45-degree angle for grip. Work your way around the sides, pulling firmly but evenly to avoid ripples. For corners, make small relief cuts in the cover (1/4 inch) and fold under like gift-wrapping. At the rear, overlap and staple securely.
Warning: Over-stretching can tear the vinyl—use a heat gun on low (200-250°F) to soften it for better molding, holding it 6 inches away and moving constantly to prevent melting.
If you’re doing a quick partial recovery for a small tear, skip full disassembly: Clean the area, apply adhesive to a matching vinyl patch, press it on, and seal edges with seam sealer for waterproofing.
Phase 3: Finishing Touches and Reinstallation
Finalize and test to ensure durability. This wraps up in 20-30 minutes.
-
Trim excess material: Use the utility knife to cut away overhang flush with staples. Hammer down any protruding staples for a smooth underside.
-
Reinforce seams: Apply a thin bead of silicone sealant along staple lines to prevent water ingress, especially for off-road use.
-
Reinstall on the bike: Slide the seat back into place and tighten bolts to 10-15 ft-lbs (check your manual). Bounce on it to test firmness.
Post-completion testing: Sit on the bike in your riding position for 5-10 minutes. Check for slippage or discomfort—if the cover feels loose, add more staples. Ride a short test loop (1-2 miles) at low speeds to verify grip and stability. If issues arise, revisit stapling or foam density.
Pro Tips for a Pro-Level Dirt Bike Seat Recovery

To elevate your recovery from good to great, incorporate these expert insights. They’ve helped countless riders achieve seats that last 2-3 times longer than stock.
-
Choose the right cover material: Go for ribbed vinyl for extra grip on aggressive terrain, but opt for smoother leatherette if you prefer easier cleaning. Avoid cheap imports that fade quickly—test samples for tear strength.
-
Customize for comfort: Add a thin gel insert under the foam for long-ride cushioning, or carve channels for better weight distribution if you’re a heavier rider (over 200 lbs).
-
Common mistakes to avoid: Don’t staple through the foam—it creates weak spots. Always pull from the center outward to prevent bunching. Skipping the adhesive tack time leads to bubbles, so be patient.
-
Optimize for performance: After recovery, apply a grip enhancer spray (like Maxima SC1) for initial break-in, improving traction without residue buildup.
-
Maintenance recommendations: Clean your new seat weekly with mild soap and water, avoiding high-pressure washers that can loosen staples. Reapply conditioner every 6 months to prevent cracking.
-
Tool hacks: If you lack a staple gun, use a heavy-duty stapler, but expect more effort. For precise cuts, mark lines with chalk before slicing.
-
Eco-friendly twist: Reuse old foam by shredding it into filler for custom shapes, reducing waste and costs.
These tweaks can make your seat feel custom-built, boosting your confidence on the trails.
When to Call in Professional Help
While DIY recovering a dirt bike seat is empowering, some situations call for pros to avoid costly errors. Signs include: severe pan damage (e.g., large cracks requiring welding), exotic materials like carbon fiber that need specialized tools, or if you’re short on time before a race. Persistent issues post-DIY, like uneven foam or cover tears during the first ride, also warrant help.
Look for certified upholsterers via the Motorcycle Industry Council or shops like those specializing in powersports (e.g., local Honda dealers). Check reviews on forums like ThumperTalk for reliability. Typical costs range from $150-300 for a full recovery, depending on your model—factor in $50-100 extra for custom foam. Always ask about warranties (aim for 1-year coverage) and request before/after photos. If under warranty, contact the manufacturer first to avoid voiding it.
FAQ
Q: How long does it take to recover a dirt bike seat at home?
A: For a first-timer, plan for 4-6 hours total, including drying times. Experienced riders can knock it out in 2-3 hours. Break it into sessions if needed, as adhesive needs 24 hours to fully cure before heavy use.
Q: Can I recover my seat without replacing the foam?
A: Yes, if the foam is only mildly compressed. Reshape it by compressing and releasing repeatedly, or add a foam topper. However, for safety and comfort, replace it if it’s over 2 years old or sagging more than 1/2 inch—old foam can lead to poor control during jumps.
Q: What’s the best adhesive for dirt bike seat recovery?
A: 3M Super 77 spray adhesive is top-rated for its flexibility and hold on foam and vinyl. Apply in light coats to prevent oozing, and allow 1-2 minutes tack time. Alternatives like HH-66 vinyl cement work for seams but aren’t as user-friendly for large areas.
Q: Will a recovered seat hold up to motocross racing?
A: Absolutely, if you use high-density foam (2.5 lbs/ft³) and durable covers like those from Corbin. Test it rigorously—many pros recover seats seasonally. Reinforce high-wear areas with extra staples or stitching for longevity.
Q: How do I match the cover to my dirt bike model?
A: Measure your seat pan (length, width, height) and check manufacturer specs. Sites like Rocky Mountain ATV/MC offer model-specific kits for bikes like the Suzuki RM-Z. If custom, provide photos and dimensions to an online supplier for a tailored fit.
Q: What if my seat pan is cracked during recovery?
A: Repair small cracks with epoxy resin and fiberglass cloth—sand, apply, and let cure for 24 hours. For major damage, replace the pan ($50-100) or consult a welder. This ensures structural integrity to prevent failures mid-ride.
Q: Is recovering a dirt bike seat cheaper than buying new?
A: Yes, often 50-70% less. A new OEM seat might cost $200-400, while DIY recovery is $50-150 in materials. Pros charge $150-300, still a savings if you value the time.
Alternative Solutions for Dirt Bike Seat Recovery
If full recovery feels overwhelming, consider these options when the DIY method doesn’t suit your setup or timeline. They’re great for quick fixes or upgrades.
| Solution | Pros | Cons | Best For |
|---|---|---|---|
| Seat Patch Kit (e.g., Tear-Aid Vinyl Repair) | Quick (10-15 min application); inexpensive ($10-20); no tools needed | Temporary fix; doesn’t restore foam; may not match color perfectly | Minor tears or rips on the go, like during a trail ride |
| Pre-Made Replacement Seat (e.g., from Seat Concepts) | Bolt-on ease; upgraded comfort/grip; 1-year warranty | Higher cost ($150-250); less customizable | Riders wanting pro quality without hassle, especially for rare models |
| Foam-Only Replacement with Stock Cover | Improves ride without full reupholster; $30-50 | Requires partial disassembly; cover may wear soon after | Budget-conscious users with intact but sagging covers |
| Universal Seat Cover Kit | Affordable ($40-60); fits most bikes | May need trimming; potential fit issues on curved pans | Beginners or multi-bike owners testing the waters |
Compare based on your needs—patching is ideal for emergencies, while full replacements shine for long-term durability.
Enjoy Your Revitalized Dirt Bike Seat
With this guide, you’ve got everything to successfully recover your dirt bike seat and hit the trails with renewed comfort and grip:
– Essential tools and materials for a sturdy build
– Detailed preparation and phased steps for flawless execution
– Pro tips and alternatives to customize your approach
Following these instructions ensures a seat that’s not just fixed, but better than new—saving you money while boosting your riding experience. Don’t wait for that next tear to sideline you; grab your tools and get started today. Your dirt bike will thank you with smoother, more confident rides.
Have you recovered your dirt bike seat before? Share your tips or challenges in the comments below to help fellow riders!


