If you’ve ever hopped on your bike for a ride only to feel sharp discomfort or numbness in your groin area after just a few miles, you’re not alone. A sore bicycle seat is a common frustration for cyclists of all levels, from casual riders to serious enthusiasts. It can turn what should be an enjoyable outing into a painful ordeal, often due to improper fit, pressure on sensitive areas, or even underlying health issues. The good news? There’s a quick fix you can try right away: adjusting your bike’s saddle height and angle to distribute weight more evenly. This simple tweak can provide immediate relief and get you back to pedaling comfortably.
In this comprehensive guide, we’ll dive deep into why your bicycle seat hurts, exploring the root causes and offering multiple proven solutions from basic adjustments to advanced customizations. You’ll learn step-by-step methods to diagnose and resolve the issue, plus prevention strategies to keep the pain at bay for good. By the end, you’ll have the confidence and tools to customize your setup for pain-free rides, ensuring your cycling experience is all about the thrill of the road rather than the ache in your seat.
Common Causes of Bicycle Seat Pain
Understanding why your bicycle seat hurts is the first step to finding relief. Bike seats, or saddles, are designed to support your weight during pedaling, but several factors can lead to discomfort. These range from equipment mismatches to riding habits and even physiological differences. Below, we’ll break down the most frequent culprits, so you can identify what’s affecting you.
Improper Saddle Fit or Adjustment
One of the top reasons your bicycle seat hurts is simply a poor fit. Saddles come in various shapes, widths, and materials, and what works for one rider might pinch or pressure another. If the saddle is too narrow, it can fail to support your sit bones (the bony parts of your pelvis you sit on), forcing soft tissues like nerves and blood vessels to bear the brunt. Conversely, a saddle that’s too wide can rub against your inner thighs, causing chafing.
Height and tilt play huge roles too. A saddle that’s too low forces you to rock side-to-side, increasing friction and pressure. If it’s tilted nose-down, your weight shifts forward onto the narrower front, compressing sensitive perineal areas. According to cycling experts at the BikeFit organization, up to 70% of saddle discomfort stems from incorrect positioning rather than the saddle itself.
Pressure on Sensitive Areas
Cycling puts direct pressure on the perineum—the soft tissue between your genitals and anus—which can lead to numbness, tingling, or outright pain if the saddle design exacerbates it. Traditional saddles with a firm, unpadded surface might feel unforgiving, especially on longer rides. This pressure can restrict blood flow, mimicking symptoms of more serious issues like pudendal nerve irritation.
Women and men experience this differently due to anatomical variations; for instance, a saddle without a central cutout might cause more vulvar or prostate pressure. Extended rides without breaks amplify the issue, as constant compression leads to inflammation. Studies from the British Journal of Sports Medicine highlight that perineal pressure is a leading cause of cycling-related discomfort, affecting up to 50% of riders.
Bike Fit and Riding Posture Issues
Your overall bike fit can make or break comfort. If your handlebars are too low or reach is too stretched, you might slide forward on the saddle, concentrating weight on the front. Poor core strength or incorrect cleat positioning on clipless pedals can also force unnatural movements, leading to uneven pressure.
Riding style matters too—aggressive downhill positions or standing frequently can shift weight dynamically, irritating the saddle interface. For beginners, this often compounds with weak glute muscles, which fail to offload pressure from the saddle. Ergonomics experts note that a mismatched frame size contributes to 20-30% of saddle pain cases.
Wear and Tear on the Saddle or Shorts
Over time, saddles degrade. Cracks in the cover, worn-out padding, or a stretched frame can create uneven surfaces that dig in. Similarly, ill-fitting cycling shorts without proper chamois padding can allow skin-to-saddle friction, leading to sores or hot spots.
Dirt, sweat, and lack of lubrication build up, worsening irritation. If you’re using road bike shorts on a mountain bike with a rougher saddle, the mismatch can cause immediate discomfort. Maintenance neglect is a sneaky culprit, as even high-end saddles lose effectiveness after 1,000-2,000 miles of use.
Underlying Health or Anatomical Factors
Sometimes, the bicycle seat hurts because of your body’s unique setup. Conditions like sciatica, hemorrhoids, or prostate issues can flare up under saddle pressure. Anatomical differences, such as a tilted pelvis or wider sit bones, mean off-the-shelf saddles don’t suit everyone.
Hormonal changes, weight fluctuations, or even dehydration can heighten sensitivity. For instance, postmenopausal women might experience more vulvar dryness, increasing friction. Medical sources like the American College of Sports Medicine advise consulting a doctor if pain persists beyond adjustments, as it could signal something like saddle sores or nerve entrapment.
How to Fix Bicycle Seat Pain

Now that we’ve pinpointed the causes, let’s tackle solutions. We’ll cover three progressive methods, starting with simple at-home tweaks and moving to more involved options. Each includes diagnostic steps, fix instructions, and testing tips. Aim to try them in order for the best results—most riders see improvement with the first one.
Method 1: Basic Saddle Adjustments (Quick and Free Fix)
This is the easiest starting point for why your bicycle seat hurts, taking about 15-30 minutes with basic tools.
Diagnosing the Issue
Sit on your bike in your normal riding position (use a trainer or have a friend hold it steady). Pedal slowly and note where the pain occurs: front, sides, or center? Check saddle height by ensuring your leg is almost fully extended at the bottom of the pedal stroke (heel on pedal). Tilt? Use a level app on your phone against the saddle.
Fix Steps
- Adjust Height: Loosen the seat post clamp with an Allen key. Raise or lower until your knee has a slight bend (25-35 degrees) at the bottom pedal. Tighten securely—overtightening can strip threads.
- Level the Tilt: Use the same Allen key on the seat rails clamp under the saddle. Aim for a level nose-to-tail; a slight 1-2 degree nose-up tilt can help for some. Avoid extreme angles.
- Fore-Aft Position: Slide the saddle forward or back so a plumb line from your kneecap hits the pedal axle when cranked forward at 3 o’clock.
- Test Ride: Take a 10-minute spin. If pain eases, great; if not, proceed to Method 2.
Warning: Always wear a helmet during tests and avoid traffic. If you’re unsure, visit a bike shop for a free fitting.
Testing for Success
After adjustments, ride 20-30 minutes. Pain should reduce by 50% or more. Track with a journal: note distance, terrain, and discomfort level (1-10 scale).
Method 2: Saddle Selection and Replacement (Mid-Level Upgrade)
If adjustments don’t cut it, the saddle itself might be the problem. This method costs $50-200 and takes 1-2 hours.
Diagnosing the Issue
Measure your sit bone width: Sit on corrugated cardboard on a hard chair, mark the indents, and measure the distance (add 20-30mm for saddle width). Assess shape—do you prefer cutouts for pressure relief? Consult online fit guides from brands like Specialized.
Fix Steps
- Choose the Right Saddle: Opt for one matching your width and riding style (e.g., narrower for road, wider for comfort). Look for models with cutouts like the Bontrager Aeolus or Selle Italia FliteBoost—gel padding helps but isn’t essential.
- Install It: Remove the old saddle by loosening the clamp. Slide the new one onto the rails, center it, and tighten to 5-7 Nm torque (use a torque wrench if possible).
- Fine-Tune: Re-adjust height, tilt, and fore-aft as in Method 1. Add chamois cream to shorts for initial rides.
- Break-In Period: Ride short sessions (10-20 miles) for a week to let it mold to you.
Testing for Success
After 50 miles, evaluate: Numbness should be minimal. If not, consider returning it—many shops offer trials.
Important: Women’s saddles often have shorter noses; don’t ignore gender-specific designs.
Method 3: Professional Bike Fit Session (Advanced Solution)
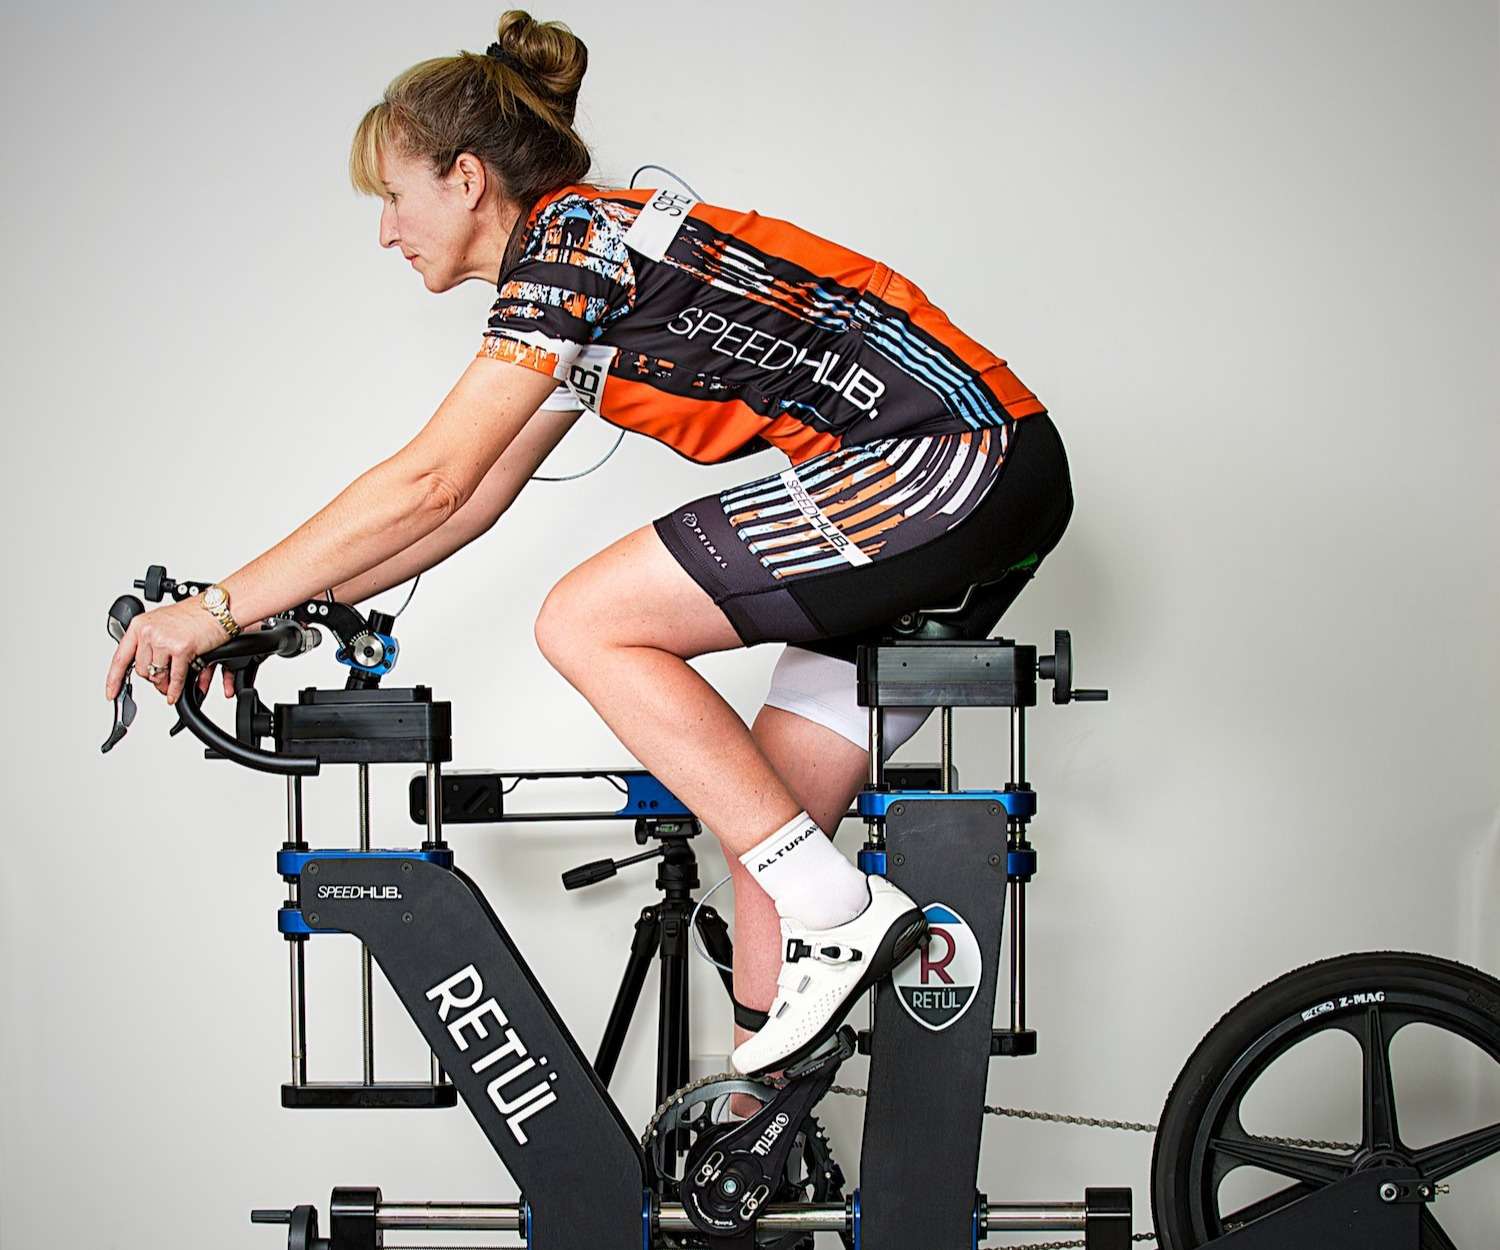
For persistent issues, a pro fit is worth the $100-300 investment, lasting 1-2 hours plus follow-up.
Diagnosing the Issue
A fitter uses motion capture, pressure mapping, and laser alignment to analyze your posture. They’ll check cleat position, handlebar height, and even flexibility.
Fix Steps
- Book a Session: Find a Certified Bike Fit technician via the BikeFit website. Bring your bike and shorts.
- During the Fit: Expect measurements, saddle tweaks, and possibly cleat rotations. They might recommend orthotics or posture exercises.
- Implement Changes: Apply adjustments at home or have the shop do it.
- Follow-Up: Return in 1-2 weeks if needed.
Testing for Success
Post-fit, log rides for a month. Pain should drop to zero on standard routes. Track metrics like average speed—fits often boost efficiency by 5-10%.
Pro Tip: Combine with core strengthening exercises like planks to support better posture.
Prevention Tips and Maintenance Advice
To avoid your bicycle seat hurts becoming a recurring nightmare, focus on proactive habits. Regular maintenance extends saddle life and keeps rides comfortable.
- Daily Pre-Ride Checks: Inspect for wear, clean with mild soap, and apply chamois cream. Rotate saddle positions slightly every few months.
- Shorts and Accessories: Invest in high-quality padded shorts (e.g., Pearl Izumi) and use anti-chafing balms. Consider saddle covers for extra padding on long tours.
- Riding Habits: Take 1-2 minute off-saddle breaks every 30 minutes. Build up mileage gradually—don’t jump from 10 to 50 miles.
- Scheduled Maintenance: Every 500 miles, check rail integrity and padding. Replace saddles every 2-3 years or 5,000 miles.
- Body Care: Stay hydrated, stretch hamstrings daily, and monitor for saddle sores—treat with antibiotic ointment if they appear.
Following these, you’ll minimize risks and enjoy longer, pain-free rides.
Pro Tips for Bicycle Seat Comfort
Go beyond basics with these expert insights to optimize your setup:
- Customize for Terrain: Use a more padded saddle for gravel; switch to a firmer one for racing to reduce bounce-induced pain.
- Avoid Common Mistakes: Don’t over-tighten clamps (it warps rails) or ignore weight distribution—aim for 60% on saddle, 40% on hands.
- Optimize with Tech: Apps like Bike Fast Fit use your phone’s camera for virtual adjustments. Pressure sensors (e.g., from Gebiomized) map hot spots precisely.
- Strengthen Supporting Muscles: Incorporate glute bridges and hip flexor stretches 3x/week to offload saddle pressure.
- Seasonal Adjustments: In cold weather, add thermal shorts; heat can worsen chafing, so use moisture-wicking fabrics.
- Eco-Friendly Lubes: Opt for natural chamois creams like DZ Nuts to avoid skin irritation from chemicals.
- Track Progress: Use a cycling app like Strava to correlate ride data with pain levels, refining your fit over time.
These tweaks can enhance performance and prevent overuse injuries.
When to Seek Professional Help
While DIY fixes resolve most cases, call in the pros if pain persists after adjustments or includes symptoms like severe numbness, blood in urine, or swelling—these could indicate nerve damage or infections.
Look for providers with credentials like Retül or BG Fit certification. Read reviews on sites like Yelp, and ask about guarantees. Costs range from $150 for basic fits to $400 for full Retül sessions. Check your bike’s warranty—modifications might void it, so document changes.
If it’s a medical issue, see a sports doctor; they might recommend scans or PT.
FAQ
Q: Why does my bicycle seat hurt only after long rides?
A: Long rides increase cumulative pressure on soft tissues, leading to inflammation or reduced blood flow. Start with shorter sessions, use better padding, and take breaks to build tolerance. If it’s numbness, check saddle tilt—nose-down positions worsen it over time.
Q: Is a softer saddle better for preventing pain?
A: Not always; overly soft saddles can cause you to sink in, increasing perineal pressure. Opt for firm models with proper width that support your sit bones. Test via pressure mapping if possible.
Q: How do I know if my saddle width is wrong?
A: Measure sit bones as described earlier (aim for 10-15cm apart). A too-narrow saddle feels like rocking; too-wide causes thigh rub. Brands like Fizik offer width-specific lines.
Q: Can cycling shorts fix bicycle seat pain?
A: Yes, quality chamois reduces friction and absorbs shock. Avoid cotton—they retain moisture. Pair with a seamless design for sensitive skin.
Q: What if I’m a beginner and my seat hurts right away?
A: Beginners often have poor form. Get a basic fit at a shop, start with hybrid bikes (more upright posture), and ride on cushioned paths. Build strength gradually.
Q: Does gender affect saddle choice?
A: Absolutely—women typically need wider saddles with central relief for anatomy. Men might prefer slimmer profiles. Brands like Terry or Rivendell specialize in gender-specific options.
Q: How long does it take to break in a new saddle?
A: 100-300 miles, depending on material. Leather molds faster but requires conditioning; synthetics take longer but are low-maintenance.
Alternative Solutions for Bicycle Seat Pain

If saddle tweaks aren’t enough, consider these alternatives. They’re great for severe cases or when you want variety.
| Solution | Pros | Cons | Best For |
|---|---|---|---|
| Suspension Seatpost | Absorbs vibrations, reduces impact pain | Adds weight (0.5-1kg), costs $100-300 | Rough terrain or back issues |
| Ergonomic Bike Seat Cover | Quick add-on padding, inexpensive ($20-50) | Can shift during rides, temporary fix | Casual riders testing comfort |
| Recumbent Bike | Shifts weight to back, zero perineal pressure | Less agile, higher cost ($500+) | Chronic pain sufferers or commuters |
| Standing Desk Pedals (e.g., elliptical attachments) | Alternates pressure off saddle | Not true cycling, limits speed | Office workers with desk setups |
Weigh these based on your needs—suspension posts shine for mountain biking, while recumbents suit long-distance comfort.
Solve Your Bicycle Seat Pain Today
With this guide, you’re equipped to tackle why your bicycle seat hurts head-on:
– Identify common causes like fit issues or pressure points
– Apply fixes from quick adjustments to pro fits
– Follow prevention tips for lasting comfort
Don’t let discomfort derail your passion for cycling—start with a simple height check today, and build from there. You’ll soon be riding farther and feeling better than ever.
Have you fixed your bicycle seat pain with these tips? Share your story in the comments below to inspire other riders!

